
This Tutorial was written on 26th June 2011 with PSP 9 and AS
It was written for people with working knowledge in PSP and AS

You will need:
1 Tube of your choice
Filter: Unlimited 2
A hot cup of coffee.
Got everything together?
Let´s get started!
Open PSP or else you can’t follow this tut…LOL.
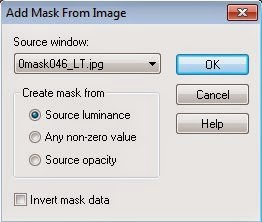
Open the Mask and minimize it.
Open the Tube: pick a lighter color for the foreground and a darker for the background, copy the Tube into the clipboard and minimize it.
Open the Template: resize to 800 *800 px, delete my Copyright.
Activate BG Layer and fill with foreground color.
New Layer (Raster1) flood fill with background color.
New Mask Layer from Image with these settings.
Merge Group.
Add Drop Shadow: -5, -5, 100, 50, white, repeat with 5, 5, 100, 50, white.
Merge Down.
Select all, modify, contract by 10 px, invert and flood fill with white.
Select all, modify, contract by 7, invert.
New Raster Layer (Raster 1) and flood fill with background color.
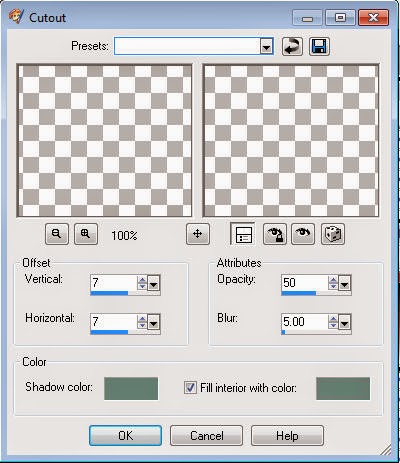
3D Effect- Cutout with these settings.
Select None.
Merge Down.
Activate Brush01 Layer: select all, Float, Defloat, fill with foreground color (watch out you still have white in there so change it to your original color first), deselect and add Drop Shadow: 1, 1, 50, 5, black.
Activate Brush02: select all, float, Defloat, fill with background color, deselect and add Drop Shadow: 1, 1, 50, 5, black.
Activate Foto01.
Paste the Tube (remember it’s still in the clipboard) as new Layer (Raster 1) into your picture, move it over foto01 if you have to resize or/and rotated to your liking and add Drop Shadow: 5, 5, 100, 25, black.
Activate Foto01 Layer again: with magic wand select object and flood fill with background color.
Activate Raster 1 Layer: invert and delete, select none.
Activate Square1 Layer: with magic wand select object. New Raster Layer (Raster 2), flood fill with foreground color, change Blend Mode to your liking (depends on your color, I used Darken), select none.
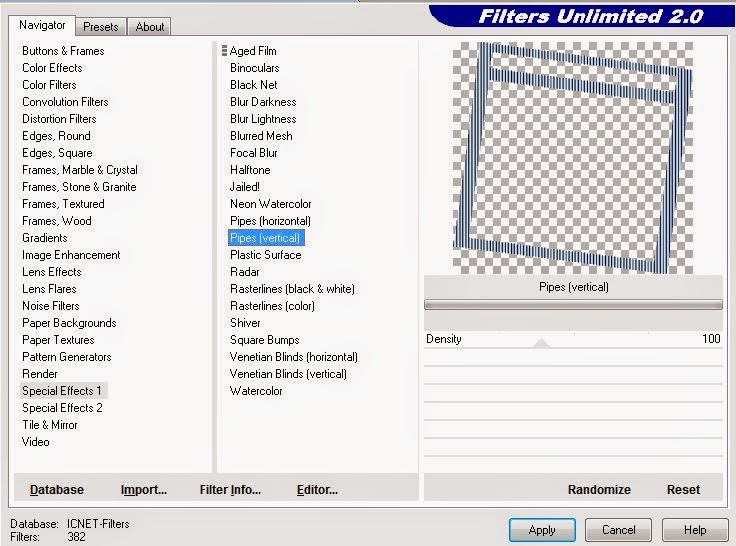
Activate Frame1 Layer: with magic wand select object, flood fill with foreground color and add Filter Unlimited 2 with these settings.
Select none.
Activate Foto02: Paste Tube as new Layer (Raster 3), move it over foto02, resize or/and rotate to your liking and add Drop Shadow 5, 5, 100, 25, black.
Activate Foto02 Layer again: with magic wand select object and flood fill with background color.
Activate Raster 3 Layer: invert and delete, select none.
Activate Square Layer: with magic wand select object. New Raster Layer (Raster 4), flood fill with foreground color, change Blend Mode to your liking (I used Color Legacy), select none.
Activate Frame2Layer: with magic wand select object, flood fill with foreground color and add Filter Unlimited 2 with the same settings as before.
Select none.
Activate Foto03.
Paste Tube as new Layer (Raster 1) into your picture, move it over foto01 if you have to resize or/and rotated to your liking and add Drop Shadow: 5, 5, 100, 25, black.
Activate Foto01 Layer again: with magic wand select object and flood fill with background color.
Activate Raster 1 Layer: invert and delete, select none.
Activate Square1 Layer: with magic wand select object. New Raster Layer (Raster 2), flood fill with foreground color, change Blend Mode to your liking (depends on your color, I used Darken), select none.
Activate Frame1 Layer: with magic wand select object, flood fill with foreground color and add Filter Unlimited 2 with these settings.
Activate Foto03 Layer: paste Tube as new Layer (Raster 5), move it over foto03, resize or/and rotate to your liking, add Drop Shadow 5, 5, 100, 25, black, duplicate Raster 5 Layer (copy Raster5).
Activate Foto03 Layer again: with magic wand selct object and flood fill with a gradient your choice (I used my two colors, linear, Angle 45°).
Activate Raster 5: invert and delete.
Activate copy Raster5 Layer: use eraser and erase everything of the Tube that sticks out on the bottom.
In your Layer palette: move copy Raster 5 Layer above Frame03 Layer.
Activate Square3 Layer: with magic wand select object. New Raster Layer (Raster 6), flood fill with foreground color (watch out you still got it on Gradient change it back to foreground color first), change Blend Mode to your liking (in this one I used Dissolve), select none.
Activate Frame03 Layer: with magic wand select object, flood fill with background color. Select none.
Activate Circle Layer: with magic wand click in every other circle, flood fill with foreground color. Select none.
Still on Circle Layer: With magic wand click in every black circle, food fill with background color. Select none.
Activate Circle Frame Layer: add Drop Shadow 1, 1, 100, 1, black.
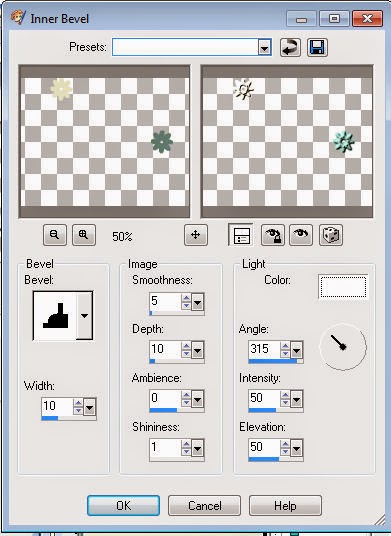
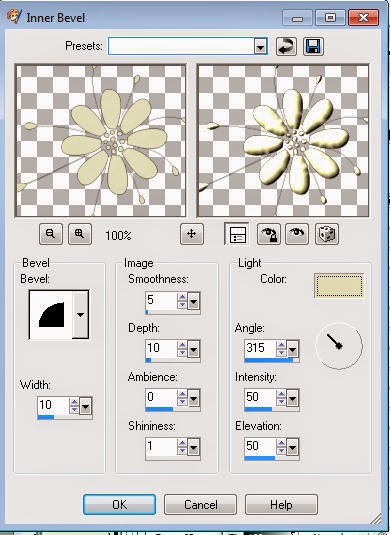
Activate Flowers Layer: if there is a flower in the way of your Tube erase it, with magic wand select 1 or 2 flowers and flood fill with foreground color, deselect. Now use the magic wand and select the other flowers and flood fill with background color. Do not deselect instead select the once you filled with the foreground color and add Inner Bevel with these settings:
Select none.
Activate Flower Layer: select all, float, Defloat, flood fill with foreground color, add Inner Bevel with these settings.
with white and move it underneath the flower Layer. Select none.
Merge all 4 Text Layers together, select all, float, Defloat, flood fill with background color, add Drop Shadow: 2, 2, 100, 1, black and -2, -2, 100, 1, black, expand by 3, new Raster Layer (Raster8), flood fill with white and move Raster 8 underneath the Text Layer. Select none.
Merge Text and Raster8, rename to Text.
Now is a good time to add your Watermark and the Artist ©Copyright.
Close visibility of Layers: Text, Arrow and Arrow Frame.
Activate BG Layer and merge visible. Rename Layer to BG.
You should have 4 Layers left.
Activate Arrow Frame Layer: Drop Shadow: 3, 3, 100, 1, background color and -3, -3, 100, 1, foreground color.
Activate Text Layer and merge down.
Just the lil animation and then your done.
Activate Arrow Layer: select all, float, Defloat, flood fill with background color. Select none.
Copy merged.
Open Animation Shop and paste as new animation.
Back to PSP: with magic wand click in the first circle of the Arrow and flood fill with foreground color. Select none.
Copy merged.
AS: Paste AFTER current frame.
PSP: undo 3 times, use wand to select 3. Circle and flood fill with foreground color. Select none.
Copy merged.
AS: Paste AFTER current frame.
PSP: undo 3 times, select 5. Circle and fill with foreground color. Select none.
Copy merged
AS: Paste AFTER current frame.
PSP: undo 3 times, select 7. Circle and fill with foreground color. Select none.
Copy merged.
PSP: undo 3 times, select all, float, Defloat, new Raster Layer (Raster1) flood fill with foreground color. Select none.
Copy merged.
AS: paste AFTER current frame.
Duplicate frame 6.
Activate frame 1 and copy.
Activate frame 7 and paste BEFORE current frame.
Click on frame 1, holt shift button down and click on frame 8 (all frames should be active now).
Change frame properties to 30.
Check your animation and save it as .gif.
Here´s one more.