Sunday, August 12, 2012

Happy Birthday Tina

Erstellt am 12. August 2012 mit PI XL.
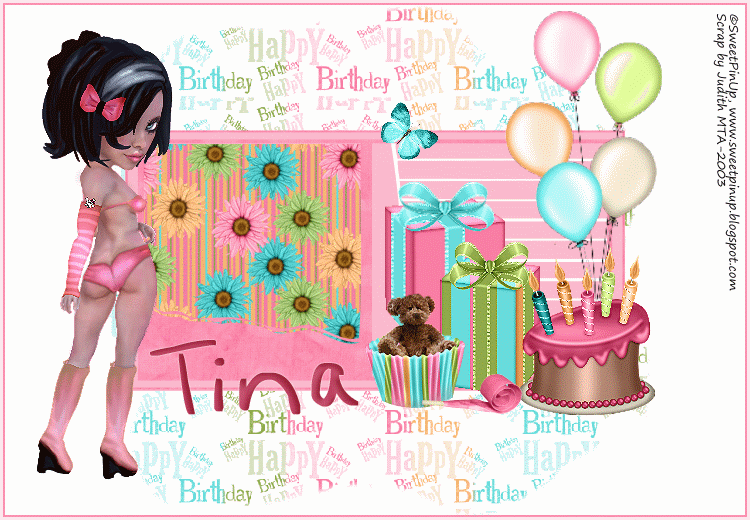
Diese Tutorial habe ich meiner Freundin TINA zum Geburtstag gewidmet.
Material:
1 Tube deiner Wahl.
Mein PTU Scrap Kit 'Happy Birthday'

Ok lass uns anfangen!
Zuerst die Maske in die Trickkiste einbauen. Tutorial hier.

Datei- Neu- Neues Bild; 750*520 Pixel.
Doppelklick auf die Maske.
Auswahl- In Objekt umwandeln.
Bearbeiten- Füllen; Bild, Datei: JF_HappyBirthday_pp_21.
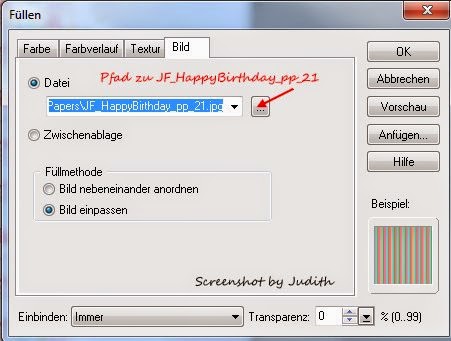
Enter.
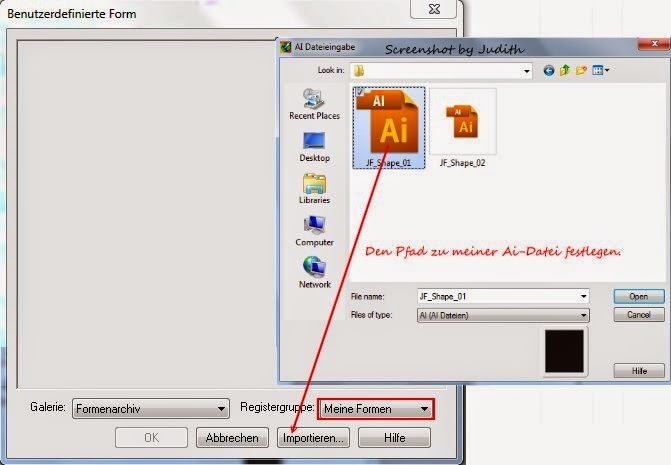
Pfad- Zeichenwerkzeug; Benutzerdefinierter Formen.
Importiere die JF_Shape_01 in die Regtistriegruppe: Meine Formen. Importieren und die Ai- Datei laden.
Einen rahmen inder Größe 500*260 Pixel in dein Bild ziehen. Die Größe kannst du unten an der Statuszeile verfolgen.
Bearbeiten- Füllen; Bild, Datei: JF_HappyBirthday_pp_05
Objekt- Ausrichten- Beide zentrieren.
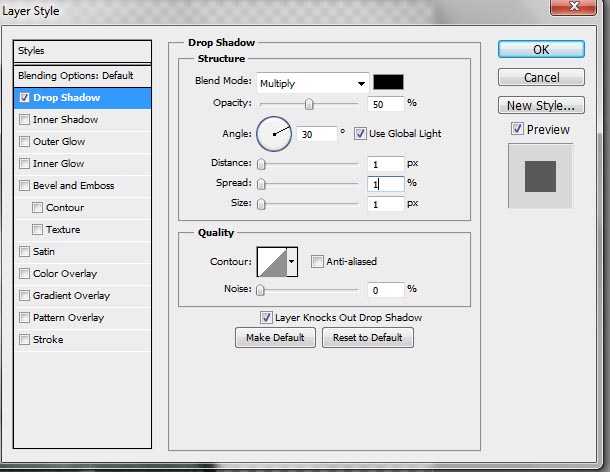
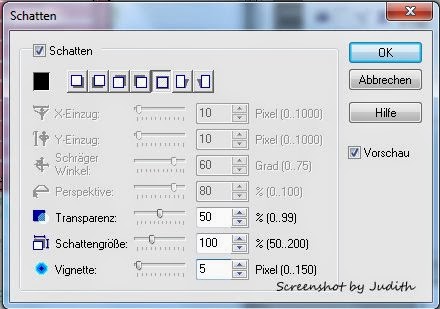
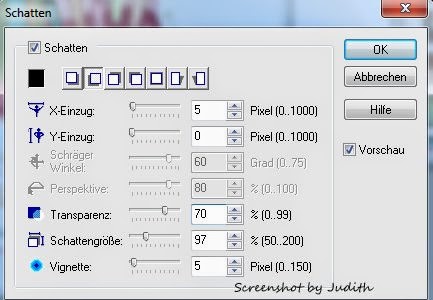
Objekt- Schatten; Rundumschatten mit diesen Einstellungen.
Importiere nun  JF_Shape_02 und ziehe Linien  in der Größe 220*240 Pixel in dein Bild ein.
Bearbeiten- Füllen; Farbe #FDFDFD.
Objekt- Reihenfolge- Nach hinten.
Schiebe die Linien rechts in den Rahmen. X: 390 Y:240
Enter.
Aktiviere das Standartauswahl WerkzeugK; Fixgröße: 500*260 Pixel.
Klicke in dein Bild rein und verschiebe die Fläche passen über den Rahmen.
Auswahl- In Objekt umwandeln.
Bearbeiten- Füllen; Farbe #FABACD oder nach Geschmack.
Objekt- Reihenfolge- Nach vorne.
Enter.

Öffne die JF_HappyBirthday_Animation.
Objekt- Alle Objekte markieren.
Bearbeiten- Kopieren.
Die Animation kannst du schließen.

Zurück zu deinem Bild.
Bearbeiten- Einfügen- Als Objekt.
Objekt- Gruppieren (nur damit wir den Überblick über die Ebenen nicht verlieren).
Alle Objekte der Gruppe sollten noch markiert sein.
Schiebe sie in die linke Hälfte des Rahmens.
Objekt- Reihenfolge- Nach hinten.

Entscheide dich für einige Scrapteile.
Per drag and drop in dein Bild ziehen.
Mit Hilfe des Verformwerkzeugs in der Größe anpassen und nach belieben platzieren.
Nachschärfen nicht vergessen.

Hier meine Wahl:
Alle Scrapteile nachschärfen: Effekt- Schärfe- Schärfen; 1. Bild.
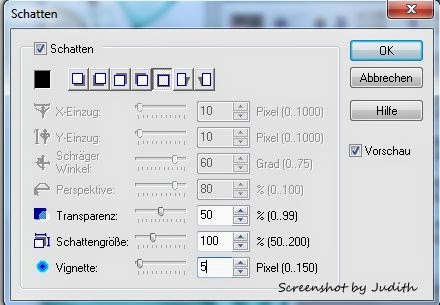
Und allen diesen Schatten geben: Objekt- Schatten; Rundumschatten mit dieser Einstellung:
JF_HappyBirthday_el_119 auf 120*161 Pixel verkleiner, X: 385, Y: 181.
JF_HappyBirthday_el_122 auf 100*156 Pixel verkleiner, X: 440, Y: 241.
JF_HappyBirthday_el_137 auf 100*117 Pixel verkleiner, X: 365, Y: 291.
JF_HappyBirthday_el_96 auf 206*400 Pixel verkleiner, X:505, Y:10.
Mit dem Radierwerkzeug den Kuchen löschen.
JF_HappyBirthday_el_57 auf 139*170Pixel verkleiner, X: 218, Y: 246.
JF_HappyBirthday_el_71 auf 73*71 Pixel verkleiner, X: 381, Y: 102.
JF_HappyBirthday_el_61auf 100*406 Pixel verkleiner, X: 422, Y: 374.

Öffne nun deine Tube. Ändere die Größe auf 450 Pixel Höh, nachschärfen und in dein Bild einfügen. Nach links schieben.
Gib folgenden Schatten auf die Tube:
Aktiviere den weißen Hintergrund.
Bearbeiten- Füllen- Farbe; #FDFDFD
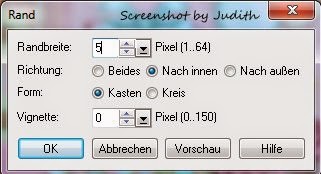
Auswahl- Rand; 5 Pixel nach innen.
Bearbeiten- Füllen- Farbe; #FA90B0
Auswahl- Alle.
Auswahl- Rand; 3 Pixel nach innen.
Bearbeiten- Füllen- Farbe; #FCE6ED.
Schreibe einen passenden Text ins Bild rein.
Wasserzeichen und ©Copyright nicht veragessen.
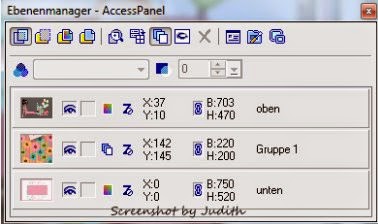
Halte die STRG- Taste gedrückt und markiere: Background, Mask, Fläche.
Objekt- Als Einzelobjekt einbinden.
Benenne diese Ebene: unten
Wieder die STRG- Taste gedrücket halten und Copyright, Text, Tube, el_61, el_71, el_57, el_96, el_137, el_118, el_119, Shape_01 und Shape_02 markieren.
Objekt- Als Einzelobjekt einbinden.
Benenne diese Ebene: oben
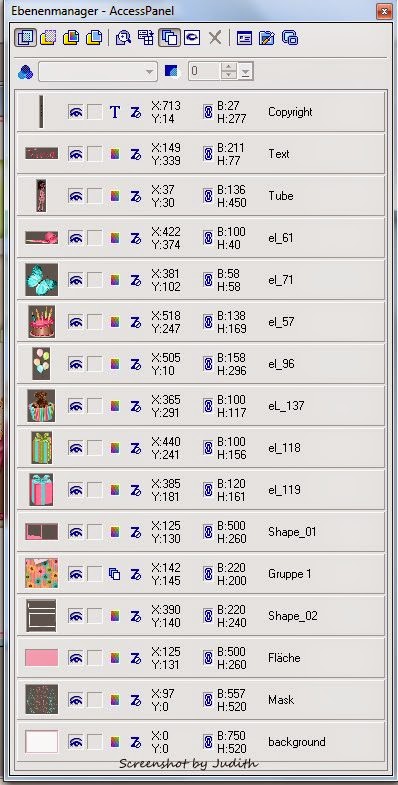
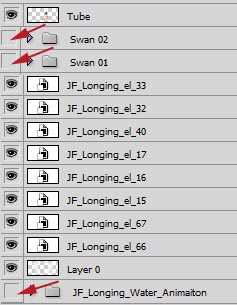
Im Ebenenmanager sollte es nun folgendermaßen aussehen.
Datei- Speichern unter, in einem Ordner deiner Wahl als .psd Datei abspeichern.

Umschalten- Gif Animator öffnen.
Bestehende Bilddatei öffnen, führe den Pfad zu deinem Bild.
Im sich öffnenden Fenster machst du einen Hacken bei: Jede Ebene als Objekt öffnen.
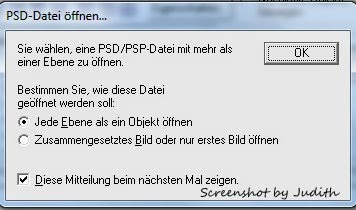
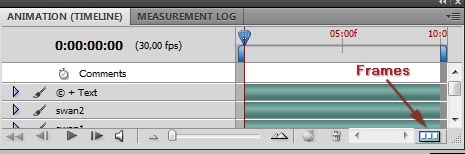
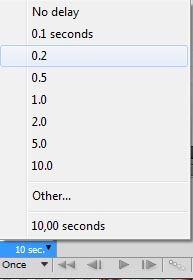
Bild- Bildeigenschaft; Verzögerung auf 30sec. Stellen.
In der Objektmanagerpalette die Augen von Obj-1 bis Obj-21 schließen.
Drücke 20 mal die STRG + F Taste.
Nun hast du unten in der Bildpalette 21 Bilder.
Aktiviere das 1. Bild und öffne das Auge von Obj-1
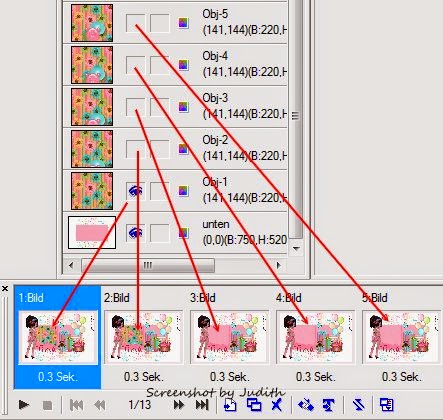
Im 2. Bild das Auge von Obj-2 öffnen.
3. Bild Obj-3 öffnen.
Und so weiter biss du alle 21 Bilder durch hast.
Klicke auf Ansicht und begutachte dein Werk.
Bist du zufrieden dann speichere es als .gif ab.
Fertig!

Sunday, July 1, 2012

Longing

Written on July 01, 2012 with PS CS5.
Supplies needed:
1 Tube 
My PTU ScrapKit 'Longing' here

Open JF_Longing_fr_04.
Ctrl + T resize the width to 70%.
Open JF_Longing_Water_Animation.
In the Layer Pallet activate the folder.
Click into your canvas, hold and drag and drop with the pointer over to your frame canvas.
Move the animation into place.
Layer- Arrange- send back.
FYI: I’m kind of a lazy girl so I hardly ever open a file just so I can copy and paste it… tooo much work … lol instead I open the folder and just move the needed element via drag and drop…. It makes live much easier. So when I’m writing “OPEN… blablabla IN YOUR CANVAS I mean drag and drop (I’m telling you this because… if elements are opened via drag and drop they have different sizes than the original and the Free Transform Tool is automatically active).
Open JF_Longing_el_66 in your canvas (drag and drop), turn it a lil counter clockwise and move it to the left side of your frame.
Layer- Layer Style- Drop Shadow: with these settings.
Layer- Layer Style- Copy Layer Style.
Open JF_Longing_el_67 in your canvas, turn it a lil clockwise and move it over to the left side.
Layer- Layer Style- Paste Layer Style.
Open JF_Longing_el_15 in your canvas, Maintain aspect radio and resize to 20% and move it the left.
Layer- Layer Style- Paste Layer Style.
Open JF_Longing_el_16  in your canvas, Maintain aspect radio and resize to 20% and move it the left.
Layer- Layer Style- Paste Layer Style.
Open JF_Longing_el_17  in your canvas, Maintain aspect radio and resize to 20% and move it the left.
Layer- Layer Style- Paste Layer Style.
Arrange all elements to your liking.
Open JF_Longing_el_40 in your canvas, Maintain aspect radio and resize to 10% and move it to the right upper corner of your frame.
Layer- Layer Style- Paste Layer Style.
Open JF_Longing_el_16  in your canvas, Maintain aspect radio and resize to 20% and move it the left.
Layer- Layer Style- Paste Layer Style.
Open JF_Longing_el_32 in your canvas, Maintain aspect radio and resize to 10%, turn it a lil clockwise and move it up into the sky.
Layer- Layer Style- Paste Layer Style.
Open JF_Longing_el_33 in your canvas, Maintain aspect radio and resize to 10%, turn it a lil counter clock wise and move it up into the sky.
Layer- Layer Style- Paste Layer Style.
Open JF_Longing_el_28 in your canvas, Maintain aspect radio and resize to 10% 
 and move it into the water.
Layer- Layer Style- Paste Layer Style.
Layer- Duplicate Layer.
Layer- Layer Style- Clear Layer Style.
Edit- Transform- Flip vertical.
Use your arrow keys on your keyboard to move the duplicate swan down to make it look like it’s the reflection in the water.
Layer- Layer Style- Blend options: Overlay 50%.
If your swan copy overlaps the pillar like mine …
Layer- Rasterize- Layer
Activate the eraser tools and erase the unwanted.
Hold Ctrl and mark both swan layers.
Layer- Group Layer.
Rename this Layer to 'SWAN 01'.
Layer- Duplicate Group and rename to 'SWAN 02'.
Edit- Free Transform: rotate a lil.
Open your Tube.
Edit- Free Transform: Maintain aspect radio and resize to 500- 550 Pixel High.
Arrange Tube to the right.
Add the following drop shadow to your Tube:
In the Layer Pallets close the eyes from the following layers: 'SWAN 02, SWAN 01 and JF_Longing_Water_Animation.
Layer- Merge Visible.
Layer- Arrange- Send Backward.
In the Layer Pallet right click into the preview window- select.
Image- Crop.
Ctrl +D.
Image- Image Size, Constrain Proportions and reduce to 850 Pixel Width
Now it is time to add the © and a matching Text.
Merge © and Text, this should be the very top layer.
Let´s get to the fun part… the animation.
You will be working in the Layer Pallet.
Lock the Layer: ©+Text and Tube. These two layers will be visible at all times.
Make 'JF_Longing_Water_Animation' visible.
Rightclick- Ungroup Layer.

'JF_WA_01' should be visible.
Make 'Swan 01' visible.
Window- Animation.
The timeline should be open but we´ll be working in the frame window so click on the frames to witch over.

Now you see your first frame.
And visible are the Layer: JF_WA_01, Tube, Swan 01 and ©+Text.
Click on the little arrow at the bottom to open up the delay time, set it to 02 sec.

Duplicate this Frame.
Visibility on Frame 2: JF_WA_02, Tube, Swan 01 and © + Text.
Duplicate Frame.
Visibility on Frame 3: JF_WA_03, Tube, Swan 02 and © + Text.
Duplicate Frame.
Visibility on Frame 4: JF_WA_04, Tube, Swan 02 and © + Text.
Duplicate Frame.
Visibility on Frame 5: JF_WA_05, Tube, Swan 01 and © + Text.
Duplicate Frame.
Visibility on Frame 6: JF_WA_06, Tube, Swan 01 and © + Text.
Duplicate Frame.
Visibility on Frame 7: JF_WA_07, Tube, Swan 02 and © + Text.
Duplicate Frame.
Visibility on Frame 8: JF_WA_08, Tube, Swan 02 and © + Text.
Duplicate Frame.
Visibility on Frame 9: JF_WA_08, Tube, Swan 01 and © + Text.
Duplicate Frame.
Visibility on Frame 10: JF_WA_10, Tube, Swan 01 and © + Text.
Duplicate Frame.
Visibility on Frame 11: JF_WA_11, Tube, Swan 02 and © + Text.
Duplicate Frame.
Visibility on Frame 12: JF_WA_12, Tube, Swan 02 and © + Text.
Duplicate Frame.
Visibility on Frame 13: JF_WA_13, Tube, Swan 01 and © + Text.
Duplicate Frame.
Visibility on Frame 14: JF_WA_14, Tube, Swan 01 and © + Text.
Duplicate Frame.
Visibility on Frame 15: JF_WA_15, Tube, Swan 02 and © + Text.
Duplicate Frame.
Visibility on Frame 16: JF_WA_16, Tube, Swan 02 and © + Text.
Duplicate Frame.
Visibility on Frame 17: JF_WA_17, Tube, Swan 01 and © + Text.
Duplicate Frame.
Visibility on Frame 18: JF_WA_18, Tube, Swan 01 and © + Text.
Duplicate Frame.
Visibility on Frame 19: JF_WA_19, Tube, Swan 02 and © + Text.
Duplicate Frame.
Visibility on Frame 20: JF_WA_20, Tube, Swan 02 and © + Text.
Hit the play button and see if you like your animation.
File- Save for Web and Devises.
And you all done!