Saturday, January 25, 2014

EMOlicious

Overwritten on January 25, 2014 using PS CS5 for people with working knowledge of the program.

Supplies needed:

1 Tube
My PTU Scrap Kit ′Emolicious′ here
My Brush ′Blinds′ here
Filter:
Eye Candy 7 here

Open a new canvas: 650*650 pixels.
Load JF_Brush_Blinds. In your Brush Tool and apply onto the canvas.
Center the brush.
Open Paper_10 in your canvas and hit Enter.
Create a Clipping Mask with your brush Layer.

Open Element_25 in your canvas and hit Enter.
Set the Blending Mode to: Darker Color.

Open Element_07 in your canvas, maintain aspect ratio and resize to: 63%.
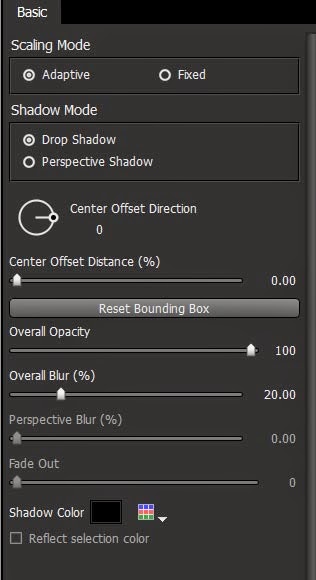
Using Eye Candy 7 apply Drop shadow according to preview.


Select both Elements (25+7) and position x:288px, y: 313px

Open your Tube of choice, size it and position on the right side x:460,50px, y:270,50px.
If you are using a half tube like me you have to erase the part on the tubes right leg that is overlapping the frame with the Eraser Tool… that way it looks like the tube is standing with one leg in the frame.
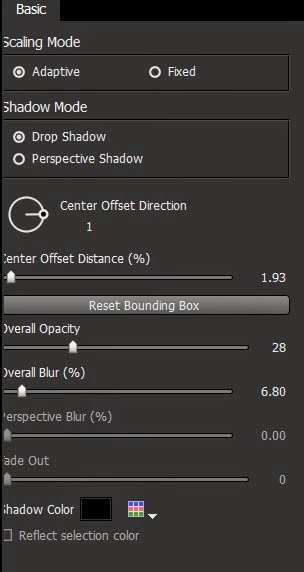
With Eye Candy 7 apply the following Drop shadow:


Open Element_30 in your canvas , maintain aspect ratio and  resize to 30%, move it over the tubes left leg, to cover the cut off.
Ctrl + F and then OK.

Open Element_55 in your canvas, Rotate -15,17° and position to x: 176,80px, y: 299,81px.
Ctrl +F and then OK.

Open Element_17 in your canvas, resize to: With: 60%, Height: -60%, Rotate -39,49° and position to x: 253,73px, y: 330,85px.
Ctrl +F and then OK.

Open Element_05 in your canvas, maintain aspect ratio and resize to 50% and position to x: 96,50px, y: 389,50px.
Ctrl +F and then OK.

Open Element_28 in your canvas, maintain aspect ratio and resize to 30%, Rotate -8,97° and position to x: 96,50px, y: 508px.
Ctrl +F and then OK.

Open Element_52 in your canvas, maintain aspect ratio and resize to 50% and position to x: 171px, y: 485px.
Ctrl +F and then OK.

Open Element_08 in your canvas, maintain aspect ratio and resize to 20%, Rotate -7,67° and position to x: 133px, y: 563px.
Ctrl +F and then OK.

Open Element_39 in your canvas, maintain aspect ratio and resize to 10%, rotate -32,52° and position to x: 432,50px, y: 562px.
Ctrl +F and then OK.

Open Element_34 in your canvas, maintain aspect ratio and resize to 25%, rotate -80,99° and position to x: 324,50px, y: 566px.
Ctrl +F and then OK.


Open Element_48 in your canvas, maintain aspect ratio and resize to 30% and position to x: 249px, y: 533px.
Ctrl +F and then OK.

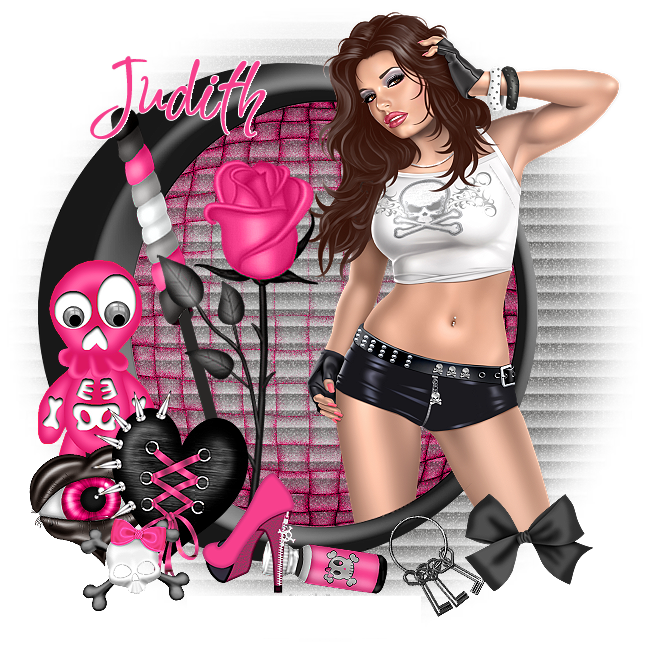
Write your name/ text and copyrights on your tag.
All done!!!

Thursday, January 23, 2014

Come Ride With Me

Rewritten on 23. January 2014 with PS CS5 (but any other version works as well).
It was written for people with working knowledge in PS.

Supplies needed:
1 Tube (I use the wonderful Artwork form Jose Cano witch you can purchase at PTE)
Tina´s Template “Heart” here
My Supplies here
Filter:
Filter Unlimited here
Funhous- ZigZaggerate and SpyroZag here

Let’s begin!
Open Ps... LOL
Open your tube and pick 2 colors from the tube for your foreground (#c4083a) and background (#6a84b7)color. Minimize the tube.
Open the Heart template.
Delete Obj-9 and all 3 Obj-8 (I know the layer names are a lil crazy here but we´ll work with that).
Fill the Background layer with a color of your choice (I used back).
Obj-14: select pixels and fill with foreground color. Duplicate and fill with background color.
Deselect.
Obj-2: select pixel and fill with foreground color (#c4083a), layer style Bevel and Emboss: leave everything as is just change the Contour to Cove-Deep.
Obj-1: select pixels and fill with background color (#6a84b7), Filter Unlimited2- Paper Textures- Fibrous Paper, Fine with the standard settings.
Activate Layer Obj-2 one more time and hit the delete button.
Deselect.
Obj-3:(do the same with both of the Obj-3 Layers) select pixel and fill with a gradient your choice. Filter Funhouse- ZigZaggerate with standard settings. The pattern depends on the gradient you use. Apply Layer Style Bevel and Emboss: change to: Inner Bevel, Smooth, 144% Depth, Up, Size 25px, everything else as is.
Deselect.
Move your tube into your picture (if your tube came with a close up use that) if you have to resize do that and place it on top of Obj-1 and create a clipping mask (hold Alt key down and click between the two layers in the layer palette). Give your tube a Drop Shadow (I changed the Opacity to 50% and the Distance to 10px.
Move the car into your picture and place it on the right side and give it the same Drop Shadow.
Move your tube one more time into your picture (use the full tube now) and place it in the car. The tube should be under the car in the layer palette. Give the same Drop Shadow as before.
If you like you can move both Obj-3 around a little to make it look the way you want to.
Now it´s time to add the ©Copyrights.
Close the visibility from Obj-5 and merge visible layers.
Obj-5: make visible and select pixel and fill with foreground color. Filter Funhouse- SpyroZag with standard settings. Layer Style Bevel and Emboss; change only the Size to 40px and the Contour to Half-Round.
Click “Ctrl+ Shift+ C” then “Ctrl+ V”.
Delete Obj-5.
Duplicate Layer2 and resize to 90% make sure you maintain aspect ratio.
Duplicate Layer2 copy and resize to 90%. And so on and until you come to Layer2 copy 9.
Close the visibility on all copy layers.
Layer 1 and Layer 2 are visible.
Open the animation window (window-Animation).
I like to work in the frames since I don’t like the timeline so much, but that is totally up to you.
Add a frame and make layer2 copy visible.
Add a frame and make layer 2 copy 2 visible… and so on until you made all the layers visible.
Now do the same backwards; meaning add a frame and close the visibility of a layer starting with layer2 copy9 and so on.
Check your animation and safe it for web and devices.
All done!!


Jürgen hat auch ein tolles Tutorial geschrieben.


Ein tolles Bildchen von Tina nach Jürgens Tutorial.